> ## Documentation Index
> Fetch the complete documentation index at: https://docs.platform.aiplanet.com/llms.txt
> Use this file to discover all available pages before exploring further.
# Configuring Agents
> Set up an agent's instructions, model, tools, and knowledge.
The Agent node is where the real work happens. An Agent node on the canvas references a **reusable agent configuration** — you either pick an existing one or create a new one.
 ## Choosing or creating an agent
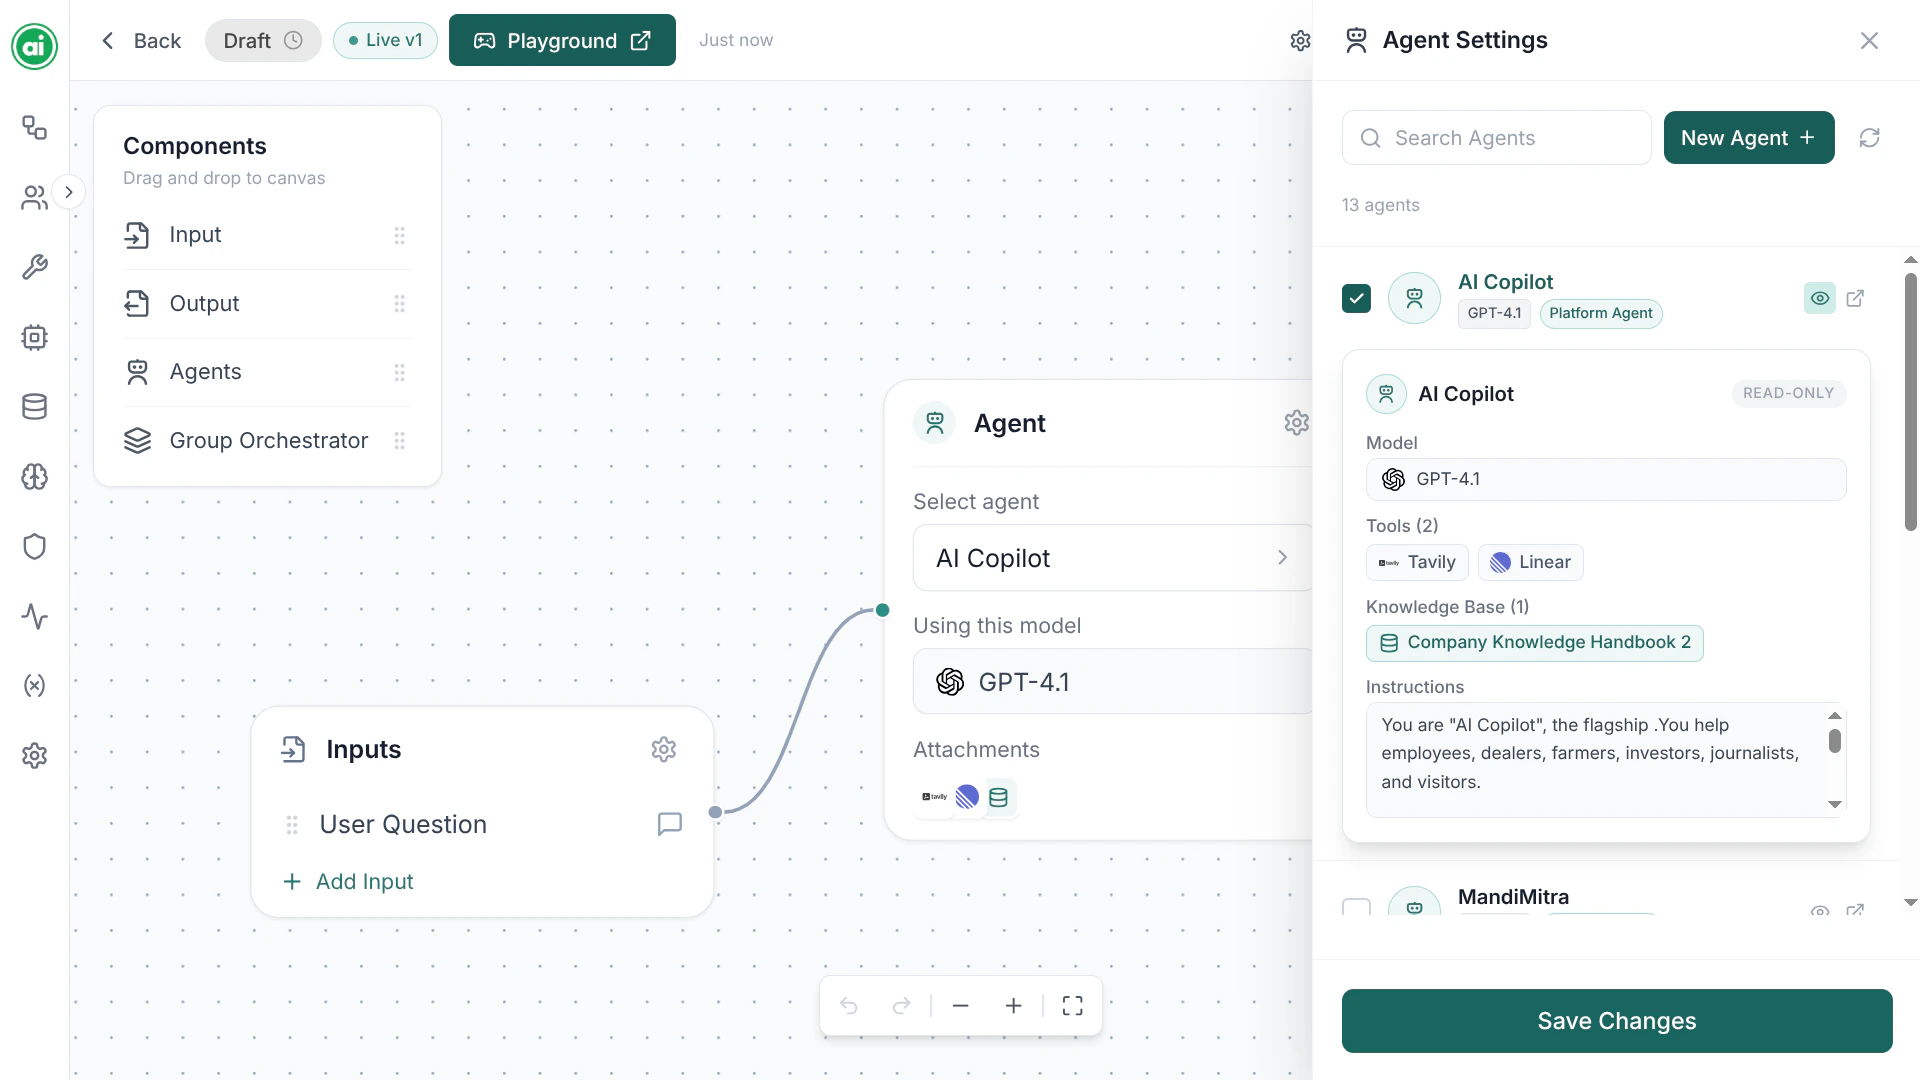
When you select an Agent node, its panel shows a searchable list of the agent configurations available to your organization. Pick one to use it, or click **New Agent** to create one — that opens the agent configuration form.
You can also manage agent configurations directly on the [Agents](/agents-models-tools/agents) page. Either way, the configuration form has the same fields, covered below.
## Name and description
Give the agent a clear **name** — something like `Answer Agent` or `Research Agent` helps you understand the workflow at a glance. The **description** is optional and for your own reference.
## Model
Choose which AI model powers the agent from the **Model** dropdown. The list shows the models configured for your organization. If the model you want isn't there, add it under [Models](/agents-models-tools/models).
## Instructions
The **instructions** field is the agent's system prompt — it defines the agent's role, behavior, and constraints. This is the single most important setting.
Good instructions are specific:
```text theme={null}
You are a customer support assistant for an online store.
Answer questions using only the information in the connected knowledge base.
If you don't know the answer, say so and suggest contacting support.
Keep responses under three sentences.
```
Iterate on instructions in the [Playground](/building-workflows/playground). Small wording changes often make a big difference — test, adjust, and test again.
## Tools
In the **Tools** section, select the tools the agent can use — sending messages, fetching data, and more. The agent decides when to use a tool based on its instructions and the task at hand. See [Tools](/agents-models-tools/tools) to set up the tools available here.
Two related settings control tool behavior:
* **Tool choice** — how the agent decides whether to call a tool (for example, letting the agent decide on its own, or requiring it to use one).
* **Allow multiple tool calls** — whether the agent can call more than one tool in a single step.
## Knowledge Base
In the **Knowledge Base** section, select a knowledge base for the agent. When one is attached, the agent can search that content and ground its answers in your own information instead of relying only on the model's general knowledge.
An agent uses a single knowledge base. See [Knowledge Bases](/knowledge-memory/knowledge-bases) to create one.
## What's set elsewhere
Two things that affect an agent are **not** part of the agent configuration — they're set once per workflow in the workflow's settings:
* **Memory** — whether the workflow retains context across messages. See [Memory configurations](/knowledge-memory/memory-configurations).
* **Guardrails** — safety policies applied to the workflow. See [Guardrails](/guardrails/overview).
## Saving
When you've configured the agent, save it. The configuration is then available to use in any workflow.
## Next steps
Try your agent with real inputs.
Publish it for your team and the API.
## Choosing or creating an agent
When you select an Agent node, its panel shows a searchable list of the agent configurations available to your organization. Pick one to use it, or click **New Agent** to create one — that opens the agent configuration form.
You can also manage agent configurations directly on the [Agents](/agents-models-tools/agents) page. Either way, the configuration form has the same fields, covered below.
## Name and description
Give the agent a clear **name** — something like `Answer Agent` or `Research Agent` helps you understand the workflow at a glance. The **description** is optional and for your own reference.
## Model
Choose which AI model powers the agent from the **Model** dropdown. The list shows the models configured for your organization. If the model you want isn't there, add it under [Models](/agents-models-tools/models).
## Instructions
The **instructions** field is the agent's system prompt — it defines the agent's role, behavior, and constraints. This is the single most important setting.
Good instructions are specific:
```text theme={null}
You are a customer support assistant for an online store.
Answer questions using only the information in the connected knowledge base.
If you don't know the answer, say so and suggest contacting support.
Keep responses under three sentences.
```
Iterate on instructions in the [Playground](/building-workflows/playground). Small wording changes often make a big difference — test, adjust, and test again.
## Tools
In the **Tools** section, select the tools the agent can use — sending messages, fetching data, and more. The agent decides when to use a tool based on its instructions and the task at hand. See [Tools](/agents-models-tools/tools) to set up the tools available here.
Two related settings control tool behavior:
* **Tool choice** — how the agent decides whether to call a tool (for example, letting the agent decide on its own, or requiring it to use one).
* **Allow multiple tool calls** — whether the agent can call more than one tool in a single step.
## Knowledge Base
In the **Knowledge Base** section, select a knowledge base for the agent. When one is attached, the agent can search that content and ground its answers in your own information instead of relying only on the model's general knowledge.
An agent uses a single knowledge base. See [Knowledge Bases](/knowledge-memory/knowledge-bases) to create one.
## What's set elsewhere
Two things that affect an agent are **not** part of the agent configuration — they're set once per workflow in the workflow's settings:
* **Memory** — whether the workflow retains context across messages. See [Memory configurations](/knowledge-memory/memory-configurations).
* **Guardrails** — safety policies applied to the workflow. See [Guardrails](/guardrails/overview).
## Saving
When you've configured the agent, save it. The configuration is then available to use in any workflow.
## Next steps
Try your agent with real inputs.
Publish it for your team and the API.